Monday, November 23, 2009

Pooh Bear Cream Cake


Guess what is the picture made of? It edible. :p


Answer:
I tried out another way for transferring picture onto cake, 'Chocolate Picture Transfer'.

It is the same method as 'Picture Outlines Transfer', just that for this you have to cover the whole picture with coloured chocolate(add colouring into melted white chocolate). Leave it to set. Then flip the 'Chocolate Picture Transfer' sheet onto the icing cake and peel off the plastic sheet. If you have a good patient, you may even add in some colour tone to the picture and it will appear more lively.

Don't you think that the chocolate picture look like 'Rice Paper Transfer Sheet'? My hubby even commented that this look nicer than the jelly picture. :) So now there is another alternative for me when making a birthday cake for my two boys. :)

Chocolate Chips Cookies


I loved to visit Kitchen Capers Store. They not only sell interesting baking gadgets, they also have free cookies samples for customers to crunch on and provide recipes for them to try it out at home as well. This is a recipe which I get from their store. The recipe is a no hassle and easy to prepare eggless Chocolate Chips Cookies. Yummy... :)

Thursday, November 19, 2009

Appreciation Awads

Warmest thanks to 'Anncoo's Hobby' for dedicating this award to my blog. :)

Wednesday, November 18, 2009

Saturday, November 14, 2009

Message Press Set


I bought this Message Press Set from Phoon Huat. Hoping this could help my piping skill. It easy to assemble and use but I felt that the wordings are too big for cake which has picture on it.

Hello Kitty Chocolate Cream Cake


I saw a lot of blog making this Picture Outline Transfer and was interested to try it. Thanks to 'Anncoo Hobby' tips and advice, and I finally give it a try. For those who are interested, you can visit 'Christine's Recipe Blog' for a clearer details.

At the same time, I even tried out the Message Press Set which I bought from Phoon Huat. I thought this will be easy for my ugly writing skill but it turn out worst, my hand kept shaking and the wordings were so ugly. :(

Overall, I'm happy with my first tried of the Picture Outline Transfer. :) However, there are rooms for improvement.

Wednesday, November 11, 2009

Red Bean Paste Chiffon Cake


Recipe

Ingredients
3 egg yolk
20g caster sugar
2tbsp cooking oil
1/8tsp salt
75g cake flour
65g red bean paste
70g thick coconut milk

3 egg white
1/4tsp cream of tartar
60g caster sugar

Step:
1. Preheat oven to 175C.
2. Cook red bean paste and coconut milk together over low fire.
3. Set aside to cool.
4. Sift flour and salt together.
5. Use a hand whisk mix egg yolk, sugar, oil, red bean mixture and flour together.
6. Whisk until well combined. (If batter is too thick, add 1/2-1tbsp of water.)
7. Use a cake mixer and whisk the egg whites and cream of tartar till frothy.
8. Gradually add in the sugar and whisk till stiff peaks form.
9. Fold in 1/4 of the meringue into the egg yolk mixture until combined.
10.Then fold in the rest of the meringue lightly in 3 portions until well combined.
11.Pour batter into a 20cm tube pan.
12.Put into a preheated oven and bake for 40mins.
13.Remove from oven, invert cake onto table until completely cool.
14.Remove from pan and serve.

Monday, November 9, 2009

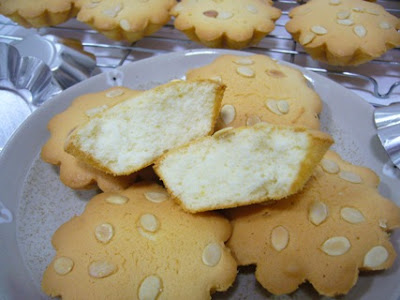
Lemon Sponge Cake


Recipe

Ingredients
135g cake flour
1/2tsp baking powder
1/8tsp salt
1tsp milk powder
200g egg
95g sugar
3/4tsp ovalette
35g milk/ water
1/2tsp lemon essence
1/2tsp grated lemon zest
40g veg. oil

melon seeds/ almond flake

Steps:
1. Preheat oven to 180C.
2. Sift flour, salt and baking powder together into a cake mixer bowl.
3. Add in milk powder, egg, sugar and milk.
4. Whisk at low speed until well blended.
5. Add in ovalette, lemon essence and lemon zest and whisk until thick and glossy.
6. Lastly fold in the oil .
7. Pipe batter into a greased mould until 80% full.
8. Sprinkle some melon seeds on the surface.
9. Bake in a preheated oven for 15-20mins.
10.Remove and cool on a wire rack.

Wednesday, November 4, 2009

Steamed Sponge Cake


Recipe

Ingredients
3 eggs
85g caster sugar
1/4tsp salt
85g self-raising flour
10g custard powder
25g veg. oil

Steps:
1. Sift flour and custard powder together and set aside.
2. Whisk the eggs, salt and sugar together until light and fluffy.(Do the ribbon test: Use the whisk to spoon some batter, drip some into the mixing bowl. If it stay visible for a while then this is the right stage.)
3. Lightly fold in the flour into the egg batter.
4. Lastly fold in the oil.
5. Pour into a lined and greased 7inches cake pan.
6. Cover with foil and steam at high heat for 25mins.
7. Remove cake and cool on a wire rack.
Sunday, November 1, 2009

Two-Tone Coconut Bread


This recipe which I tried out is by Alex Goh 'Magic Bread'. All the recipes in this book used gelatinized dough (烫种面团) to make breads. It was easy to prepare the gelatinized dough and I was amazed by the softness and springy texture of the bread. :)

Recipe

Ingredients
Gelatinized Dough(烫种面团):
100g bread flour
70g boiling water

Bread Dough:
(A)
400g bread flour
10g milk powder
25g coconut milk powder
75g sugar
7g salt
8g instant yeast

(B)
165g water
1 egg

(C)
75g butter

(D)
few drops of green food colouring
80g raisins

Steps:
Gelatinized Dough:
1. Add boiling water into the bread flour, mix until it form a soft dough.
2. Cover and set aside to cool.
3. Keep it in the fridge to rest for at least 12 hours.

Bread dough:
1. Leave the gelatinized dough aside to thaw for 10-15mins.
2. Mix (A) in a cake mixer with a dough hook attracted until well-blended.
3. Add (B) into the dry ingredients, beat at medium speed until it form a rough dough.
4. Add in the gelatinized dough and continue to beat until well-blended.
5. Lastly, add in (C) continue to beat until it form a smooth and elastic dough.
6. Take out 400g of the dough and mix in (D) until well-blended.
7. Leave the rest of the dough plain.
8. Cover both the doughs and let it prove for 45-55mins.
9. Roll both doughs into round shape, cover and rest for another 10mins.
10.Use a rolling pin and roll out both doughs into rectangular shape.
11.Place the flatten green dough on top of the plain dough and roll it up like Swiss roll.
12.Cut the dough into 9-10 pieces and arrange it onto a greased and bottom lined with greaseproof paper 9inches round tin.
13.Cover and leave to prove for 45mins until it doubled in size.
14.Preheat oven to 175C.
15.Brush surface with milk and bake in a preheated oven for 20-25mins until brown.
16.Remove buns from tin, brush surface with butter and cool on a wire rack.